Looking for an efficient way to export Revit sheets to DWG? This comprehensive guide will walk you through using the MLabs Export Sheets to DWG plugin to seamlessly convert your Revit sheets directly into AutoCAD Model Space.
📋 Table of Contents
A. How to Download and Install the Plugin
- Download the plugin: Get the latest installation file from our official page: MLabs Official Page
- Install: Run the downloaded installer and follow the on-screen instructions.
- Launch Revit: Open Autodesk Revit and load your project.
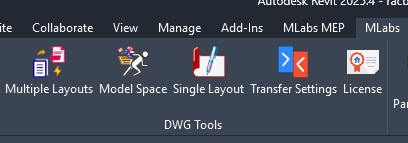
- Locate the tool: Navigate to the MLabs tab on the Revit ribbon, as shown in the image below:
B. How to Export Revit Sheets to Model Space (with Titleblocks)
The “Model Space” feature is the core function that allows you to combine multiple Revit sheets into one seamless AutoCAD file within a single Model Space. This enables you to display all your drawings in model space at the exact scale.

💡 Note: Some steps are identical to our “Multiple Layouts” guide. Therefore, this section will only focus on the settings specific to Model Space exporting.
1. AutoCAD Template File
You can leave the default value as acadiso.dwt or acad.dwt, or browse to select your custom template. The plugin will use this specified template to merge your files accurately.
2. Conversion Scale Options
Understanding how scales translate from Revit to AutoCAD is crucial for accurate dimensioning. Here are your options:
a. Scale model based on layout (Default Min Scale if “As indicated”)
This option scales your drawing based on its original viewport scale. For example, if your drawing has a scale of 1:50, it will be scaled up 50 times upon export. As a result, the dimension values in AutoCAD’s Model Space will reflect the real-world measurements.
If your sheet contains multiple scale values, Revit displays the scale as “As indicated”. Upon exporting with this option, the drawing will be scaled based on the minimum scale available on that specific sheet.
Example: If your sheet has 3 viewports with scales of 1:50, 1:100, and 1:200, Revit shows “As indicated”. After exporting, the entire drawing will be scaled up following the 1:200 value (the minimum scale).
b. Keep layout scale at 1:1 in model space
By default, the scale in an AutoCAD layout is 1:1. Even if each layout has multiple viewports with their own scales, exporting to model space with this option keeps the overall layout scale unchanged. This means if your viewport scale is 1:50 and a real-world dimension is 5000, measuring it directly in the exported model space will only yield a value of 100.
c. Scale model based on layout (Default 1:1 if “As indicated”)
Similar to option (a), this setting scales your drawing based on its designated scale (e.g., scaling up 50 times for a 1:50 drawing to retain real-world dimension values).
However, if your drawing has multiple scale values (“As indicated”), it will default to a 1:1 scale upon export, functioning exactly like option (b) for mixed-scale sheets.
C. Execute and Review Your Export
Once you have configured all your desired settings, simply click the OK button to run the export and merge process. Sit back and relax while the plugin automates your entire drawing package!
📺 Watch the plugin in action via our video tutorial below: