1. Basic Features
This tool makes it super easy to move data back and forth between Revit and Excel, all without messing up your main Revit model.
1.1. Export Excel
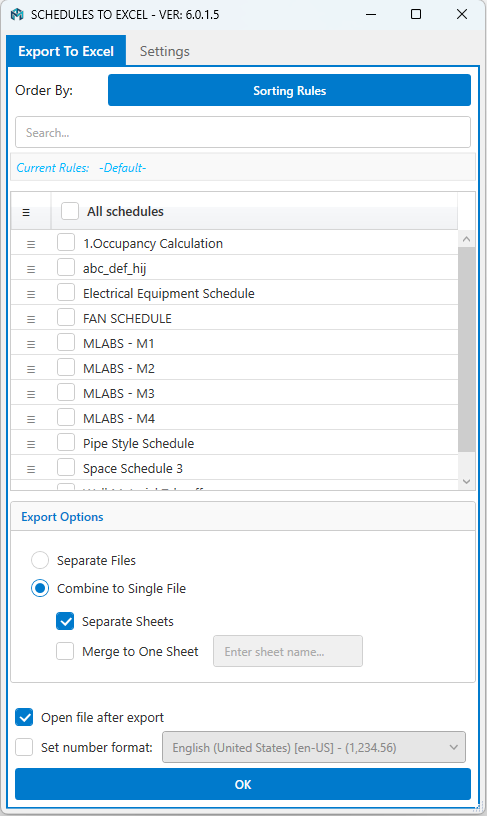
a. Export To Excel Tab
- Order By: Sorts your schedules using specific parameters. Since the plugin doesn’t exactly match Revit’s built-in sorting right away, we use custom Sorting Rules to get things organized.
- Sorting Rules Button: Supports up to six levels of nested sorting.

The plugin sorts things based on your first parameter. If a few schedules have the exact same value, it moves on to the second parameter to break the tie, and it keeps doing this for up to six levels!
Note: Right now, it only supports Ascending Order — so that means A to Z, and lowest to highest numbers.
- Schedule List: Shows all your available schedules in a handy list. The order here is pretty important because it sets the order of the sheets in your exported Excel file. Just drag and drop the rows to set them up exactly how you want.
- Export Options:
- Separate Files: Saves each schedule into its very own Excel file.
- Combine to Single File:
- Separate Sheets: Combines all your Revit schedules into one Excel workbook, giving each schedule its own separate tab.
- Merge to One Sheet: Puts all the data from your selected schedules onto one giant master sheet.
- Open File After Export: Automatically opens up Excel so you can check out your file the second it’s done.
- Set Number Format: Automatically formats numbers based on your region’s settings. If you leave this unchecked, your numbers will just show up as plain text.
b. Setting Tab
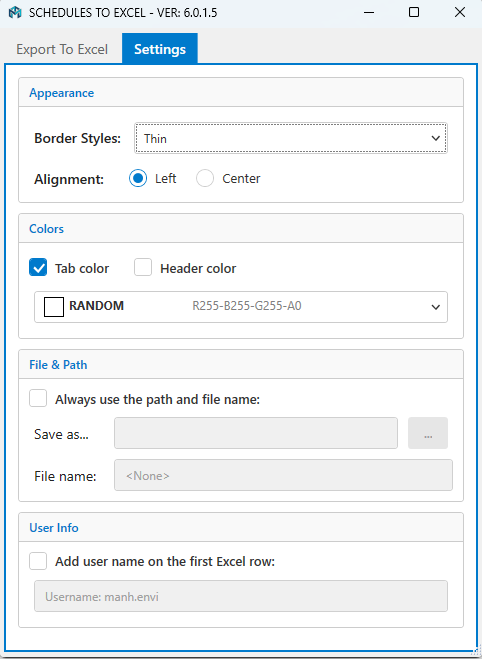
- Appearance: Pick your favorite cell border styles in Excel and tweak how your text lines up.
- Colors: Change up the tab colors in your Excel sheet and pick a cool background color for your table headers using the dropdown menu.
- File & Path: Checking “Always use the path and file name” makes sure your files always save to the same folder with a standard name. This is perfect if you want to keep your workflow automated and smooth.
- User Info: Automatically pops the username of the person doing the export right into the first row of the sheet.
1.2. Import Excel
This handy feature lets you smoothly bring your Excel spreadsheets back into Revit while keeping all your original text formatting and setups exactly as they were.
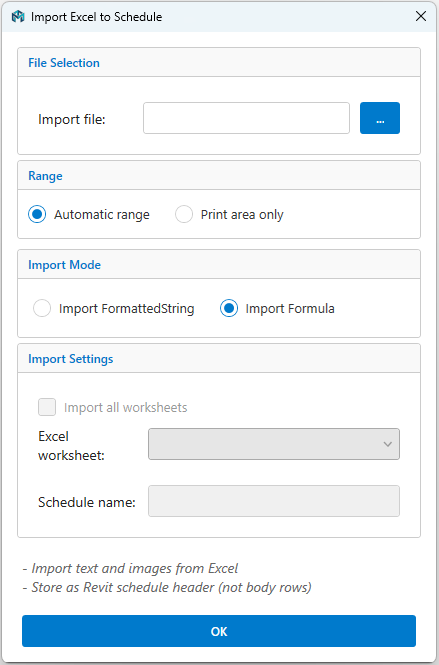
- File Selection: Browse your computer and pick the Excel spreadsheet you want to use.
- Range: Pick Automatic Range to let the plugin find where your text ends, or go with Print Area Only if you just want to import the specific print area you set up beforehand.
- Import Mode: Choose whether you want to pull in the final formatted text or the raw formulas straight into Revit.
- Import All Worksheets: Imports all your worksheets at the same time. If a schedule in your active Revit model has the exact same name, the system will automatically overwrite it.
- Schedule Name: Lets you set up your own custom names for any new schedules created in Revit.
2. Excel ⇆ Schedule
Caution: This feature gives you full read/write access, meaning you can directly change live Revit project data right from your Excel rows. Please be super careful when making these edits!
2.1. Schedule Link (Box)
*Note: Whenever we say “Box”, we’re just talking about the main floating menu window.
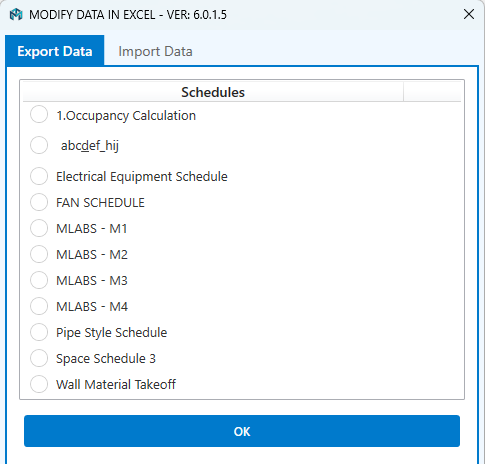
Pick a schedule to export. Your new Excel file will use a handy color-coded format to keep things organized. Here’s what the colors mean:
- Black Text (Default): These are Instance Parameters that you can freely edit.
- Red Text: Read-only info (you can’t change these).
- Blue Text: Type Parameters that you can adjust.
- Gray Text: Helpful system notes to explain what’s going on.
- Gray Highlighted Row: Watch out for these! It means a row didn’t sync right or the data is locked. Usually, it’s just a random error where the plugin couldn’t grab the right Revit Element ID.
- Purple Text: Type Names. If you type in a name that already exists, it links to that one. If you type a brand new name, it actually creates a completely new type right inside Revit for you!
For Yes/No fields (Boolean parameters), just type “Yes” or “No” straight into the spreadsheet. If you’re using a non-English version of Revit, make sure to use the translated words that match your column headers.
If you leave a cell totally blank, it’ll reset or clear out that data back in Revit (where allowed).
Once you’re happy with your Excel edits and saved them, jump over to the Import tab in the main ScheduleLink (Box) window. Load up your saved sheet to push everything back into your Revit project.
Pro Tip: You can always save your old Excel files to re-import them later! Sometimes, after a big software update, old templates might act a little glitchy. If that happens, here’s an easy fix: (1) Export a brand new schedule from Revit. (2) Copy your data from your old spreadsheet and paste it into the new one. (3) Run the Import step again. It rarely happens, but it’s a great backup plan!
2.2. Schedule Link (Sync)
This tool keeps all the same features as the standard Box method, but adds awesome real-time syncing! You can make tweaks in your spreadsheet, and the second you hit “Save”, those updates are instantly pushed to your live BIM model.
Please note: While you’re using this live sync feature, your main Revit window will be temporarily locked so everything stays safe.
3. Excel ⇆ Families
This section covers how to easily tweak your Family parameters using Excel.
3.1. Export Parameters
Inside your Project (.rvt): Select one or multiple family elements around your project. Run the tool, then pick a spot on your computer to save the new .xlsx file.
Inside your Family Files (.rfa): Just click the tool directly from the toolbar while you have the family open, choose where to save it, and you’re good to go!

- Blue Text Layouts: Parameter names that you’re totally free to change.
- Red & Green Text Layouts: Locked values that you can’t edit from here.
- Light Blue Highlights: Formulas that you can customize however you need.
- Light Red Highlights: Formulas that are strictly locked and read-only.
3.2. Import Parameters
Select your edited Excel file to push all those property changes right back into your Revit families.
Developer Note: We’re always working to make this feature even better! If you run into any weird bugs or issues, please send us your logs or feedback so we can keep improving it. Thanks for the help!
Export Import Excel
Easily boost what Revit can do and pull out your data with just a single click. Export your project stuff to Excel and bring it right back in without a hitch, saving you tons of manual data entry!
download (.exe) Autodesk Store (.msi)